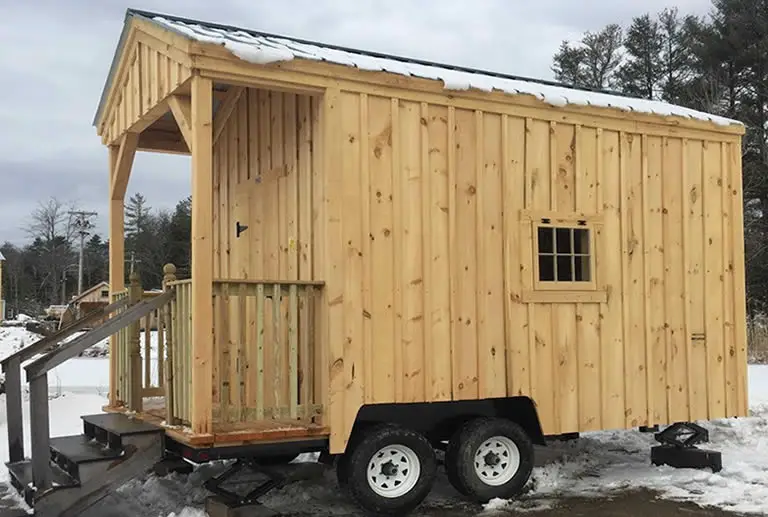
You’re building a shed, maybe its going to be a she shed, man cave or just a regular shed, but you are still deciding what you can add to it to make it awesome. One day, you have a eureka moment. Your shed needs wheels! While it’s easier to buy a shed with wheel or put wheels on a new shed, than it is to put wheel on a preexisting shed, it’ is doable. How? Let’s take a look at that now.
Here’s how to put your shed on wheels in 7 simple steps:
- Remove all personal effects from the shed.
- Check the shed for structural integrity.
- Add jacks beneath the floor beams for all corners.
- Raise the jacks and add caster wheels, attaching with wood screws.
- Lower the jacks.
- Test the wheels.
- Roll your shed freely.
Want Your Shed on Wheels? Follow These 7 Simple steps
If you have an afternoon to spare, you can outfit your shed, man cave shed or just regular shed, so it can roll wherever you want it to go whenever the mood strikes you (within reason, of course).
Below are seven essential, but easy steps to follow so you can get your shed mobile! Keep reading for steps and tips for putting your shed on wheels!
Step 1. Empty your shed
Before you can proceed to the point where you will be adding wheels to your shed, you need to make sure you remove all personal effects from inside it. That’s why, as I mentioned before, if you are creating a man cave or she shed it’s easier if your shed is still being built, as you will not have yet decorated it or added any furniture.
If you have any furniture already in the shed such as tables and chairs etc. you should leave them in the shed. You should remove as many appliances as you can such as battery operated fans and heaters for example. It also applies to heavier appliances such as a TV.
Anything hanging on the walls has got to go as well since you’re going to tip your shed upward.
Also remove curtains from any windows too, or fasten leem securely so they don;t flap about and tangle with other stuff.
When you’re done emptying your shed, don’t worry about storing it too far away as you should be able to complete this work quickly and can thus move the stuff back into the shed and redecorate within the same day.
Maybe just move your belongings, and appliances or other things that are susceptible to damage, inside if you don’t intend to complete the work all in one day.
Step 2. Ensure the shed’s structural integrity stays intact
If you built your shed yourself a awhile back, ot it has been sitting in your yard for several years, then you probably haven’t seen it naked in quite a while. Now is a great time to confirm that your shed is in good shape, especially since you’ve broken it in. A quick inspection is needed before you get to work making the shed mobile.
What are you looking for when you give the place an inspection?
Keep your eyes peeled for any signs of damage, no matter how small that damage may seem because manipulating the shed can quickly turn a small problem into a big one. We’re talking things like hairline cracks in the wood or small holes and signs of rot or rust. These issues may start off as minor nuisances when you first begin the process of “wheeling” your shed, but further down the line, they could necessitate major repairs or lead to your shed being unusable.
Don’t forget to take a quick glance over the corners of the shed and also the floor, as these are two often missed areas that are skipped during inspection.
If you do see damage in parts of your shed, make sure you repair it. Weak points can be bolstered or you can pay close attention to them as you manipulate the shed during the “wheeling” part of the process. Just keeping an eye of specific weak point areas, or places that have slight damage, is often all that is needed to avoid inflicting further damage as you lift the shed. Avoiding potential further damage from occurring may be as simple as gently tilting the shed one way or the other.
This is a great time to spot potential problems with your shed, something that is rarely done during normal shed usage.
It’s ideal if you can determine what might have caused any existing damage you spot on your shed so you can prevent future recurrences once you have started to put the wheels on. For example, a hole in the wood might look like a natural feature, but it isn’t. More than likely, the hole is where a termite exited through. When termites get into your wood, they can affect the structural integrity of the whole shed.
Alternatively, the shed may have been placed too close to an area that promoted damp and rot and so once the shed is fitted with wheels it will be easier to move it to a more suitable location or several inches away from the problem should you move the shed back to its original position.
Step 3. Add jacks to the four corners of the shed
After you finish looking over your shed, if it’s in good enough condition to proceed, then it’s time to lift ‘er up so you can attach your wheels.
Add jacks to all four corners below the floor beams to give your shed enough lift to get underneath it.
This may sound like a silly thing to say but you should check that your caster wheels move freely before you attach them to your shed. This should be done before you jack up the shed. There is nothing worse than going through the entire process of adding wheels only to find that one or more of them are defective or stiff.
If you find that a wheel is reluctant to turn, adding a little grease on the wheel bearings will usually fix the problem. However, when purchasing wheels new be sure to check them in the store before buying them.
Step 4. Raise the jacks and attach the shed wheels
With your jacks set up, raise them two by two or even one by one. If you do life each jack separately then be sure to raise them slowly.
Raise the first jack only about 1 inch before doing the same with the other 3. This prevents too much strain being placed on each part of the shed that is being lifted.
Should you lift a jack to its final position before lifting the others to an equal or similar height the strain could cause damage to the integrity of the shed and worsen any problems that already exist.
Lift all jacks no more than six inches.
What kind of wheels should you attach to the shed?
You need heavy-duty caster wheels capable of holding up the weight of your shed. If you don’t know how much your shed weighs, then now is a good time to find out.
If you’re still assembling your shed, then you can calculate its weight by putting each board on a scale and keeping track of what each of the boards weigh. Remember the number of boards you use and then add everything together to determine the shed’s total lumbar weight.
Okay, but what if you already built your shed? How do you weigh it then?
You could rent or buy an industrial scale, but that’s expensive and inconvenient. A better option is to ballpark the shed’s weight based on its size and its construction material.
If your shed is a standard 8 x 12 wooden shed, then it should weigh around 1,500 pounds. If it’s a 12 x 32 wooden shed, then its base weight is probably about 3,531 pounds or so.
The above base weights assume that your shed is made of wood, so if your shed is made from metal you will have to adjust the weight appropriately. If you have a metal shed, then it’s even lighter and the wood used in shed construction is heavier than the metal used. For instance, a 6 x 10 wooden shed weighs 1,200 pounds on average while a metal shed of the same size can weigh as little as 200 pounds.
Once you know how much your shed weighs, you can then divide that number by four to calculate the max amount of allowable weight per caster wheel. these wheels from Steelex are 8 inches in diameter and are of industrial strength. Each one can hold up to 500 pounds, so four of these wheels could support a 2,000-pound shed.
Use wood screws to attach the caster to the corner of the shed while the shed is on the jacks.
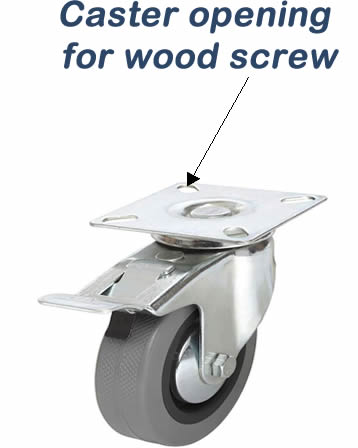
For every caster opening you see, a screw needs to go in there. When you’re done with one caster, repeat this step for the other three.
Step 5. Lower the jacks
Now that all four wheels are attached, it’s time to lower your jacks back to ground level.
Do this gradually so you don’t bang up the shed on its way down, taking the same approach as you did when jacking up. Lower each jack only 1 inch at a time until all jacks are at the same time height before repeating the process until the shed is resting on its wheels at ground level.
Take out the jacks from under the shed one at a time, taking care to put wheels chocks in place so the shed doesn’t move.
Step 6. Take it for a test drive
With all the jacks gone, and the chocks removed, you can roll your shed freely. Go on and give it a push.
Do the wheels work alright and are they secure?
If the shed moves freely and easily then congratulations, you’ve installed caster wheels on your shed and that baby is now fully mobile!
If any of the wheels are getting stuck, then put the jacks back under your shed, lift it up, and check that you installed the wheels correctly and look for any obstructions. With good quality wheels it is unlikely there will be a problem.
Step 7. Keep on rollin’
Now’s the time to refurbish that shed.
Put back all the interior items that you removed from the shed back into it. Move the shed only a few feet before checking that the interior has stayed intact. DOing this will help you identify things that need secured when you go to move the shed for real and thus prevent future damage of the shed and the items in it.
Continue to use your shed as you did before but roll about as you wish, as your shed now has the awesome ability to be fully mobile!
The benefits of having a shed on wheels
Now that your shed has wheels, you’re at such an advantage compared to having a stationary shed.
Why?
I’m so glad you asked! Below are the perks you can enjoy from a mobile shed in your yard.
You can change up your view often
Maybe today you feel like angling your shed so it faces the house, but on Thursday, you’d prefer to roll your shed over to a different corner of the yard that overlooks your favorite cherry blossom tree. If your whims change on a dime, your shed is built to fulfill even those most fickle whims.
Maybe you’re one of those women or men who enjoys the same view for a while but then you eventually get bored. No problem … all you have to do is scoot your shed over to a different part of the yard and you’ve got a whole new set of scenery to gaze upon whenever you look out the window. How cool is that?
You’ll be able to move with the sun
If your some shed is insulated while others aren’t then the autumn and winter can lead to some pretty cold days. You usually plug in a small space heater in your shed and wrap up in a couple of layers of blankets, but why not let Mother Nature warm you as well?
You can be a sun chaser in your shed, rolling it so you’re always within the soothing, bright rays. That might mean adjusting your shed several times from sunup to sundown, but you won’t mind the extra bit of work if you attached your wheel correctly as it will be as easy as moving a wheelbarrow trolley.
You can block the wind
Just as you can move with the sun, you can move away from the wind.
As the fall sets in and the summer days begin to turn into memories it can be frustrating dealing with warmish sun but colder winds. Instead of giving up on your she shed, or man cave shed, when the wind starts to pick up, you can simply turn it around for instant calmer weather.
You’ve the ability to get away from pollen during allergy season
In the spring, when the world turns green and some flowers being to sprout, you stay cooped up indoors to prevent the onset of allergy symptoms. If your allergies are so bad that you often miss out on time in your shed because you don’t want your runny nose and sneezing to flare up, having the capacity to move the shed can be a godsend.
If it’s pollen that leaves you watery-eyed, red, and swollen, then good news! Now you can move your shed far away from all the greenery in your yard so you can increase the distance between yourself and all the pollen.
You can spend time in the side yard
Who says your shed has to remain confined to the backyard only?
Since your shed has wheels, you can explore other parts of your property such as the side yard and even the front yard if your partner doesn’t mind. That way you can be the envy of all your neighbors.
With your shed on wheels you can avoid that hell on heels
Sometimes you just need time away from your better half and with a shed on wheels you have the ability to make sure you are far away from them 😉. I jest of course!
Conclusion: why you should make a shed on wheels
Is your shed stationary? It doesn’t have to stay that way.
Adding wheels to your shed is low-cost and a pretty simple process to complete.
You only need a few hours and a couple of supplies and once the job is done you’ll have endless freedom to roll to-and-fro, increasing your enjoyment of your shed even more!